

I love my Mac. I adore my iPhone. I wear my Apple Watch religiously. I guess you could call me an Apple girl. But, I’m sorry, I just can’t fall in love with the Apple Photos program.
I’ve really tried, friends, but here’s my beef:
- It stores your actual photo files in a hidden folder which is not obvious to access.
- Once you uncover your actual photo files, you’ll discover that they’re saved in a BAZILLION (I wish that was an exaggeration) subfolders that make no sense… some are even empty! You’d think 2014/02/21 would be photos taken on February 21, 2014, yes? Not necessarily. It could include a few from October 2006 and maybe even some September 2012 thrown in as well. Because obviously that makes sense.
- It doesn’t play nice with non-Apple programs. I use Amazon Cloud Drive, Google Photos, or Dropbox as my cloud backup providers, but I haven’t found a way to easily sync via the Photos program. You’re locked into iCloud (which for the record, Apple says is not meant to be used as a ‘backup’ program so there’s that).
Long story short, I broke up with Apple Photos. Yes, you can do that! If you’ve been questioning your love for Apple Photos too, here’s a tutorial for breaking up.
how to get your photos out of Apple Photos (iPhoto)
So, here’s the tricky thing… there’s not one easy, foolproof + FREE method for getting your photos out. There are a few options, which have their pros + cons, so pick the one you think will work best for you.
OPTION 1: Export from Apple Photos.
- Open Apple Photos, highlight the photos you need (control+A will select them all) and go to File/Export. Adjust your settings to maximum file size and keep all the metadata
- Designate where you want the exports to save (a folder on your desktop or external hard drive).
- Wait for it to process (it can take a few hours depending on the number of photos you’ve selected).
The downside: the ‘Date Created’ for all exported files will display as TODAY’S DATE in Finder, not the actual date the photo was taken. Hugely annoying!
The workaround: Download Adobe Bridge (it’s a free program). In Bridge you’ll be able to view the true Date Created (from the photo’s metadata) instead of the Date Exported. You can sort into your preferred folder structure (I like year/month) using Bridge. You can also sort your photos based on the photo’s metadata using Big Mean Folder Machine (costs $19.95)- it’ll create the year/month folders and sort your photos into them automatically!
OPTION 2: Navigate to your “Masters” folder.
- In Finder, click on your user home directory and find the Pictures folder. Inside there’s a Photos Library file.
- Right click (or Control + Click) on the Photos Library and select “Show Package Contents.” Inside you’ll find a folder called “Masters” that contains all your photo files (the screen shots in this article are helpful). If the computer is running Catalina operating system or newer the Masters folder may be called “Originals” or “Masters.legacy.”
- Copy + Paste this Masters folder onto your desktop or external hard drive.
The downside: These Masters files are saved in subfolders by year/month/date/time (a LOT of folders). If these subfolders don’t bother you, then you’re done! You can copy/paste that Masters file right onto Amazon Cloud Drive or your preferred cloud service and your backup is complete!

The workaround: Purchase Big Mean Folder Machine– drag your Masters folder into the ‘input’ space and designate a new folder on your external hard drive as the output. I adjust the settings so it creates folders by Year (first hierarchy) and Month (second hierarchy). The program costs $19.95. But consider the many, many hours it will save you. Trust me when I say your time AND your sanity is worth that one-time fee.
If you don’t want to pay for Big Mean Folder Machine, here’s a manual, but free trick to take photos out of subfolders:
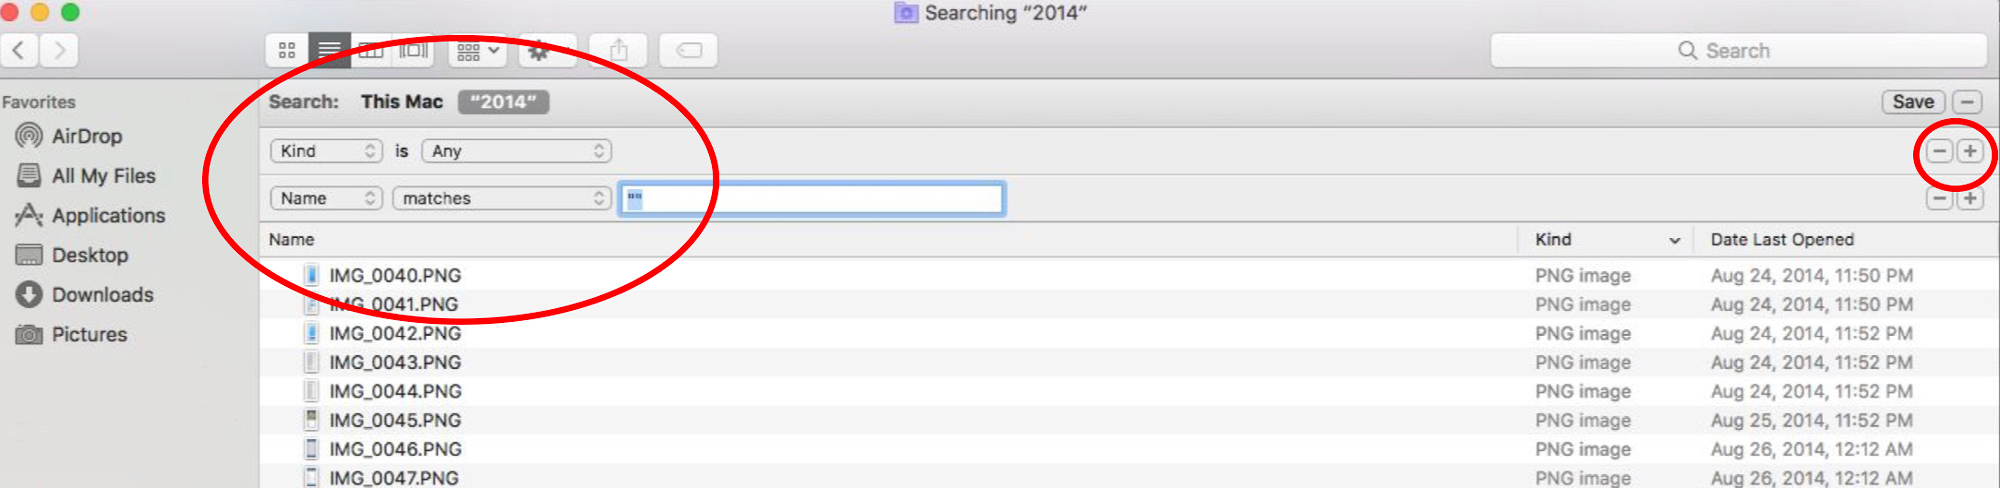
- Open the Masters/Year folder in Finder. Option + F to open the search functionality. Set Type to Any. Add a field for Name matches “”.
2. Highlight the photo files. Drag into a new folder.
3. This *should* remove them from the subfolders, but double check before deleting the original folders (right click on the original folder and choose ‘get info’ to see the folder file size- if the figure is in KB you’re good to go, if it’s a high MB or GB, some files likely remain in those subfolders… and at this point you can join me in cursing Apple Photos.)
It’s worth noting: after all that work, I’ve found instances where the photos are incorrectly filed by Apple Photos (ex: 2012 photos residing in 2014 subfolders). I use Adobe Bridge to double check the true ‘Date Created’ dates of my photos.
____________________________________________________________________
Want more in-depth video tutorials showing how to get your photos out of Apple Photos and organized into simple folders? Learn how to centralize, organize + properly backup your photos in my popular Backup Bootcamp course!


