

Lately, I’ve been sharing a lot of iPhone photos in my blog posts. While I obviously love taking photos with my ‘big camera’ [a Canon 5d mark iii], sometimes it’s just not convenient. The photographer in me has become a bit of a photo snob though [at least I can admit it] and I am not happy with the quality of many iPhone photos. Since I heavily rely on these to document our daily life, I’ve been striving to improve my phone photography.
A few months ago I shared my tips for taking better photos of your kids, which focused primarily on composing & lighting your images. So this post focuses on tips for taking better technical photos & tweaking/editing them to really impress.
Before we get started, do yourself a favor and turn off your flash. Permanently. Ok, that’s better.
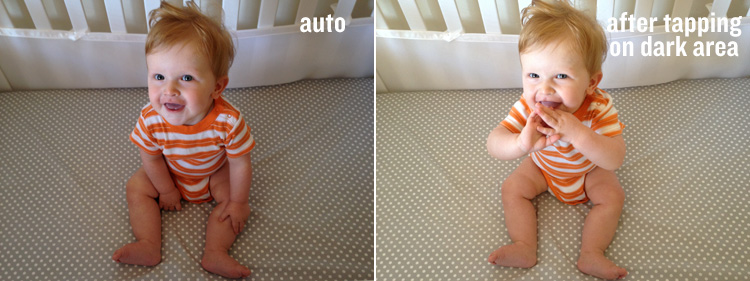
1) Adjust the brightness, before you take the photo. It’s super easy. With the Camera App open, tap the screen to make the focus square appear on the face of the person/object. The phone will then automatically adjust the lighting of your photo to be brighter/darker.
In general, I like my photos on the bright side and I find my iPhone tends to be a bit too dark. So I ‘trick’ the phone by tapping on the darkest portion of my screen [whether or not there’s a face/object there] before I take the photo- it then brightens the entire image.
- This tip is especially helpful for taking sunset photos of silhouettes. Tap on the sky to automatically adjust the photo so that the details of the sky are visible and not completely white.
2) Play around with Panoramic! This functionality is built into the Camera App now for all iPhones (not just the 5). Tap ‘options’ and select Panoramic. Hold your phone and slowly rotate, while it captures the photo. It’s fun & SUPER simple!

3) Make subtle edits using the PicTapGo App. When Instagram came along, everyone [myself included] started going crazy with editing their iPhone photos. It was so easy to pick a filter and achieve a look. My only complaint was that a lot of the ‘looks’ were too dramatic, trendy & detracted from the photo. Far from the clean & simple style that I prefer. Now, I use Pic Tap Go to do my editing. The filters are adjustable in intensity and allow you to create a much more realistic look. Here’s an example:

My favorite filters are Brightside, Lights On, Randsburg & Mason. I typically lower the intensity & combine them.
4) For a different look, try the VSCO cam app. I don’t use this app nearly as much as PicTapGo, but I do like the output quite a bit- it’s meant to simulate the look of film. I usually use the filters at full intensity too. Here’s an example:
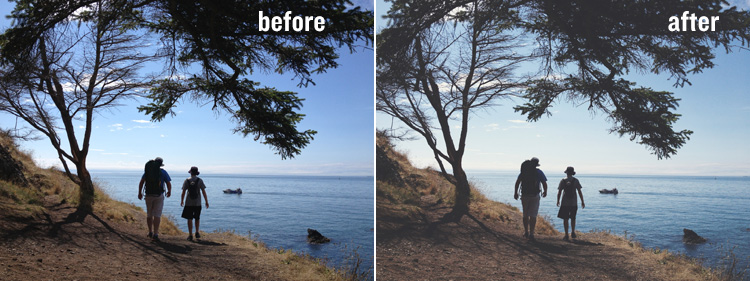
Nothing was really wrong with the photo on the left [I tapped on the sky to get the right exposure, like we talked about earlier]
but I personally like the softness that the VSCO filter added to the final version on the right.
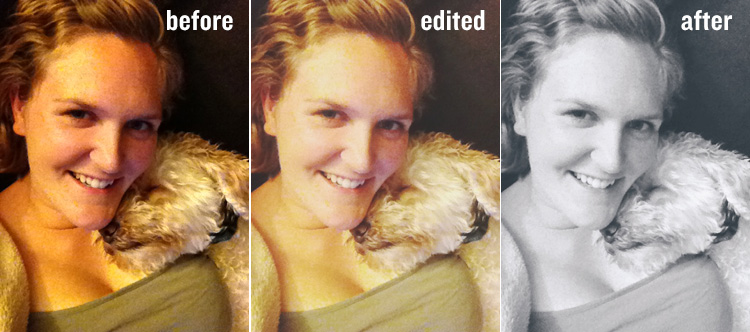
5) Struggling with indoor lighting? Go black & white! Indoor lighting can be so harsh & unflattering. It’s also difficult for the iPhone to get bright enough [since we turned off that nasty flash!], so use the editing apps to brighten even more & convert to black/white.
Here’s an example [everyone always wants a more flattering ‘selfie’, right?]
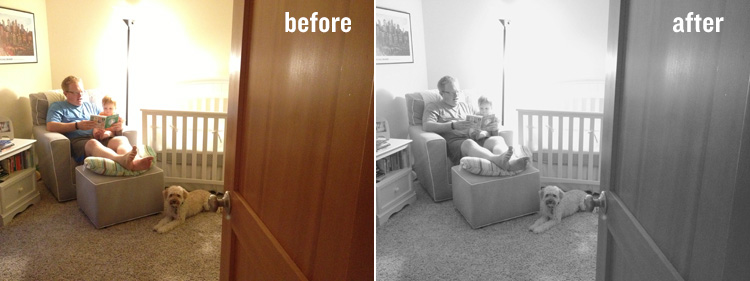
Not convinced about turning off that flash? You can’t capture candid moments [like the one below] with that obnoxious flash! I created the look below by tapping on the darkest area of the screen before I took the photo, then brightening even more and converting to Black/White in PicTapGo.
Hopefully that was helpful! Want to see more of my daily iPhone photos? Follow me on Instagram!


