

This year I’ve been devoting one week a month to a themed blog series, with daily blog posts. I’ve talked all about project life, shared some ‘wish someone told me sooner’ parenting advice, written about ways to preserve your memories/photos, revealed our favorite things in West Seattle, and this week is ALL ABOUT PHOTO EDITING!
Yesterday I covered my favorite editing techniques/apps to use on your phone, but from here on out the blog posts will be dedicated to Photoshop (at least until the blog series ends on Friday, that is). Today’s post contains 3 SUPER simple photoshop tricks to improve your blog photos… all of them just take one click! Don’t have a blog? No worries, these tips are applicable to anyone handling digital files, really.
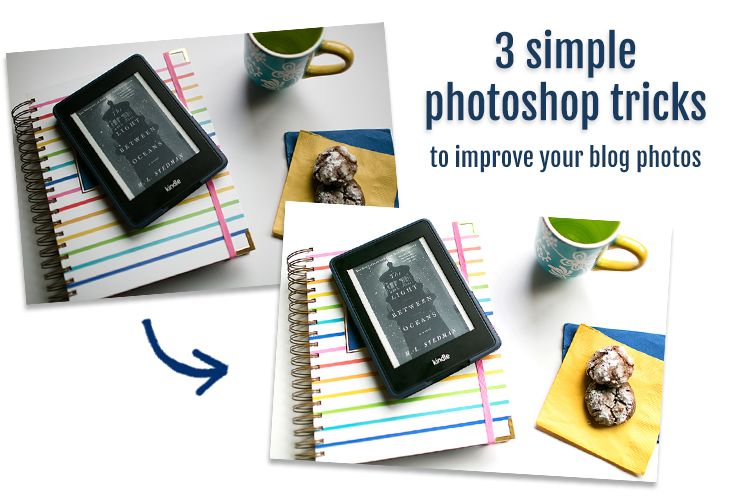
3 Simple Photoshop Tricks to Improve Your Blog Photos
[not a book learner? don’t miss the video tutorial at the end of this post!]
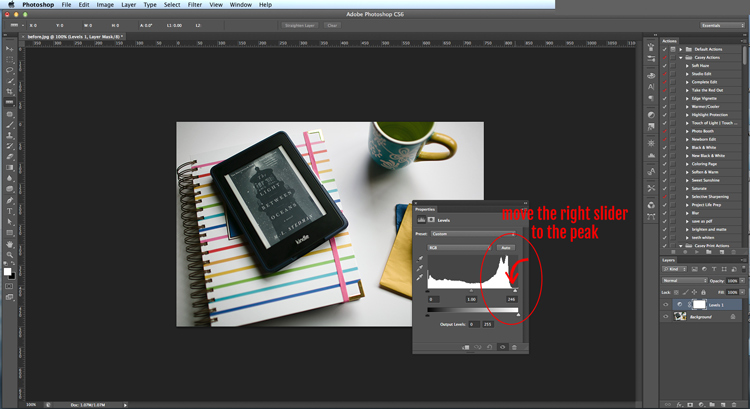
tip #1: whiten your whites in one click
Flat lay images are all the rage on blogs and if you’ve ever attempted a flat lay on a white background, you’ve probably noticed that it NEVER comes out looking white. My phone tends to create harsh blue color casts, but even photos straight out of my fancy camera look dingy & gray.
I remember when I first discovered this little Photoshop trick, I felt like a light bulb went off… aha! it’s THAT easy?! Yes, you can brighten your whites with just one click in Photoshop using a levels layer.
- Step 1: Create a levels layer (click the circle under the layers display and select levels).
- Step 2: Drag the right slider so that it lines up with the edge of the right peak.
- Step 3: Sit back and admire your perfectly white whites.
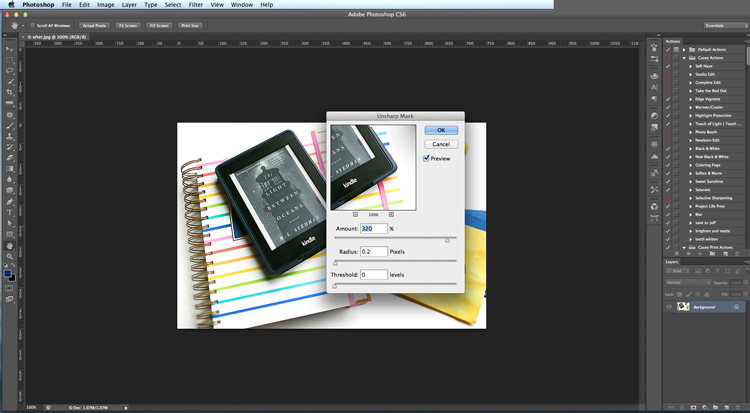
tip #2: sharpen your photos for web
This trick will give your images a little extra polish. When files are uploaded to the web, they lose a little bit of their clarity. To combat this, you can sharpen your image in Photoshop before you upload. There are many ways to sharpen and everyone has their own preference on how sharp is TOO sharp, but here’s how I do it:
- Step 1: (optional) Create a new layer.
- Step 2: Click Filter/Sharpen/Unsharp Mask.
- Step 3: Adjust the settings.
- My settings: Amount 320% I Radius: 0.2 pixels I Threshold: 0 levels
- If you created a new layer at the start, you can adjust the opacity to your liking, but these settings usually work at 100% opacity for me.
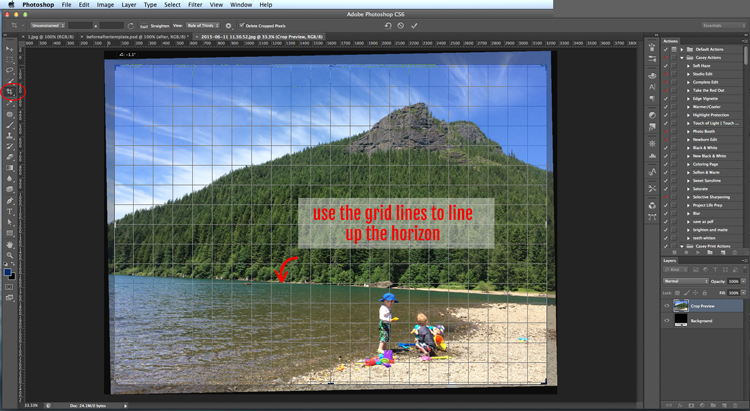
tip #3: straighten and crop
When there are leading lines in your image and they’re not level, it’s really distracting (and looks unprofessional). This is the easiest trick and probably something you’ve already done many times, but a quick reminder never hurt. Now that the grid lines display as you’re rotating your crop (that wasn’t always the case), there’s no excuse!
- Step 1: Select the crop tool.
- Step 2: (optional) Set to ‘constrained’ and add the dimensions that are optimal for your blog theme.
- Step 3: Rotate the image until the grid lines are straight with your horizon line (or other lines in the image like a fence post, window ledge, etc).
video tutorial
See the edits in action!
More photo editing tips & photoshop tutorials are coming all week long! If you’d like to receive a summary in your email inbox at the end of the week, enter your email address here!


